3DoF 매니퓰레이터를 URDF와 rviz를 통해 표현해보자.
패키지 생성
$ cd ~/catkin_ws/src/
$ catkin_create_pkg test3dof_description urdf
Created file test3dof_description/CMakeLists.txt
Created file test3dof_description/package.xml
Successfully created files in /home/andy/catkin_ws/src/test3dof_description. Please adjust the values in package.xml.
VSCode에 ROS1관련 확장인 ms-iot.vscode-ros를 설치한다. 이 확장은 urdf를 작성하는데 도움을 준다.
구상
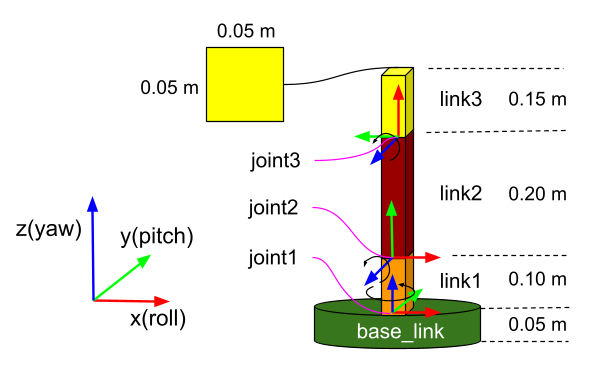
링크와 조인트에 적용할 값들을 그림으로 그려본다.
우선 base가 있어야 하고 그위로 3 DoF 매니퓰레이터이므로 조인트와 링크가 각각 3개 있어야 한다. 조인트는 각 링크의 끝에 존재한다. 조인트에서는 좌표축을 설정하는 것이 중요하다. 회전축을 무조건 z 축으로 잡는다. 그리고 조인트의 x 축은 이전 조인트의 z 축과 직교해야 한다.
base_link는 5cm 높이로 설정하고 나머지 링크들은 순서대로 10cm, 20cm, 15cm로 설정한다. 그리고 각 링크 단면의 가로와 세로 길이는 모두 5cm로 설정한다.
urdf 작성
$ cd ~/catkin_ws/src/test3dof_description/
$ mkdir urdf
$ cd urdf
$ code test3dof.urdf
material 설정
각 링크를 구별해서 보기 위해 링크 별로 다른 색상을 지정할 수 있도록 미리 정한다. 알파 값은 모두 반투명하게 1.0으로 설정한다.
base: green (0.0 0.5 0.0 1.0)
link1: orange (1.0 0.5 0.0 1.0)
link2: brown (0.5 0.0 0.0 1.0)
link3: yellow (1.0 1.0 0.0 1.0)
<!-- base_link -->
<material name="green">
    <color rgba="0.0 0.5 0.0 1.0"/>
</material>
<!-- link1 -->
<material name="orange">
    <color rgba="1.0 0.5 0.0 1.0"/>
</material>
<!-- link2 -->
<material name="brown">
    <color rgba="0.5 0.0 0.0 1.0"/>
</material>
<!-- link3 -->
<material name="yellow">
    <color rgba="1.0 1.0 0.0 1.0"/>
</material>
조인트들의 관계를 설정한다.
joint2의 위치는 joint1에서 joint1의 z 축 방향으로 10cm 떨어져 있고 방향은 joint1의 기준 좌표를 joint1의 x축을 기준(roll)으로 90°회전되어있다.
<origin xyz="0.0 0.0 0.1" rpy="1.57 0 0"/>
joint3의 위치는 joint2에서 joint2의 y축 방향으로 20cm 떨어져 있고 방향은 joint2의 기준 좌표를 joint2의 z 축을 기준(yaw)으로 90°회전되어있다.
<origin xyz="0.0 0.2 0.0" rpy="0 0 1.57"/>
링크들을 표현한다.
링크들은 조인트의 기준 좌표를 이용하여 표현된다.
base_link는 바닥에서 z 축 방향으로 5cm 높이의 반지름이 40cm인 원기둥으로 설정한다.
<cylinder radius="0.4" length="0.05"/>
link1은 joint1의 z 축 방향으로 길이가 10cm이고 단면이 5cm x 5cm인 박스로 표현된다.
<box size="0.05 0.05 0.1"/>
link2는 joint2의 y 축 방향으로 길이가 20cm이고 단면이 5cm x 5cm인 박스로 표현된다.
<box size="0.05 0.2 0.05"/>
link3은 joint3의 x 축 방향으로 길이가 15cm이고 단면이 5cm x 5cm인 박스로 표현된다.
<box size="0.15 0.05 0.05"/>
완성된 test3dof.urdf 파일
<?xml version="1.0" ?>
<robot name="test3dof">
    <!-- base_link -->
    <material name="green">
        <color rgba="0.0 0.5 0.0 1.0"/>
    </material>
    <!-- link1 -->
    <material name="orange">
        <color rgba="1.0 0.5 0.0 1.0"/>
    </material>
    <!-- link2 -->
    <material name="brown">
        <color rgba="0.5 0.0 0.0 1.0"/>
    </material>
    <!-- link3 -->
    <material name="yellow">
        <color rgba="1.0 1.0 0.0 1.0"/>
    </material>

    <link name="base"/>

    <joint name="fixed" type="fixed">
        <parent link="base"/>
        <child link="base_link"/>
    </joint>

    <link name="base_link">
        <collision>
            <origin xyz="0 0 0.025" rpy="0 0 0"/>
            <geometry>
                <cylinder radius="0.4" length="0.1"/>
            </geometry>
        </collision>
        <visual>
            <origin xyz="0 0 0.025" rpy="0 0 0"/>
            <geometry>
                <cylinder radius="0.4" length="0.05"/>
            </geometry>
            <material name="green"/>
        </visual>
        <inertial>
            <origin xyz="0 0 0.025" rpy="0 0 0"/>
            <mass value="1"/>
            <inertia ixx="1.0" ixy="0.0" ixz="0.0" iyy="1.0" iyz="0.0" izz="1.0"/>
        </inertial>
    </link>

    <joint name="joint1" type="revolute">
        <parent link="base_link"/>
        <child link="link1"/>
        <origin xyz="0 0 0.05" rpy="0 0 0"/>
        <axis xyz="0 0 1"/>
        <limit effort="30" lower="-2.617" upper="2.617" velocity="1.571"/>
    </joint>

    <link name="link1">
        <collision>
            <origin xyz="0 0 0.05" rpy="0 0 0"/>
            <geometry>
                <box size="0.05 0.05 0.1"/>
            </geometry>
        </collision>
        <visual>
            <origin xyz="0 0 0.05" rpy="0 0 0"/>
            <geometry>
                <box size="0.05 0.05 0.1"/>
            </geometry>
            <material name="orange"/>
        </visual>
        <inertial>
            <origin xyz="0 0 0.05" rpy="0 0 0"/>
            <mass value="1"/>
            <inertia ixx="1.0" ixy="0.0" ixz="0.0" iyy="1.0" iyz="0.0" izz="1.0"/>
        </inertial>
    </link>


    <!--  Joint 2 -->
    <joint name="joint2" type="revolute">
        <parent link="link1"/>
        <child link="link2"/>
        <origin xyz="0.0 0.0 0.1" rpy="1.57 0 0"/>
        <axis xyz="0 0 1"/>
        <limit effort="30" lower="-2.617" upper="2.617" velocity="1.571"/>
    </joint>

    <!--  Link 2 -->
    <link name="link2">
        <visual>
            <origin xyz="0 0.1 0" rpy="0 0 0"/>
            <geometry>
                <box size="0.05 0.2 0.05"/>
            </geometry>
            <material name="brown"/>
        </visual>
        <collision>
            <origin xyz="0 0.1 0" rpy="0 0 0"/>
            <geometry>
                <box size="0.05 0.2 0.05"/>
            </geometry>
        </collision>
        <inertial>
            <origin xyz="0 0.1 0" rpy="0 0 0"/>
            <mass value="1"/>
            <inertia ixx="1.0" ixy="0.0" ixz="0.0" iyy="1.0" iyz="0.0" izz="1.0"/>
        </inertial>
    </link>

    <!--  Joint 3 -->
    <joint name="joint3" type="revolute">
        <parent link="link2"/>
        <child link="link3"/>
        <origin xyz="0.0 0.2 0.0" rpy="0 0 1.57"/>
        <axis xyz="0 0 1"/>
        <limit effort="30" lower="-2.617" upper="2.617" velocity="1.571"/>
    </joint>

    <!--  Link 3 -->
    <link name="link3">
        <visual>
            <origin xyz="0.075 0 0" rpy="0 0 0"/>
            <geometry>
                <box size="0.15 0.05 0.05"/>
            </geometry>
            <material name="yellow"/>
        </visual>
        <collision>
            <origin xyz="0.075 0 0" rpy="0 0 0"/>
            <geometry>
                <box size="0.15 0.05 0.05"/>
            </geometry>
        </collision>
        <inertial>
            <origin xyz="0.075 0 0" rpy="0 0 0"/>
            <mass value="1"/>
            <inertia ixx="1.0" ixy="0.0" ixz="0.0" iyy="1.0" iyz="0.0" izz="1.0"/>
        </inertial>
    </link>

</robot>
check_urdf를 사용하여 작성한 urdf에 문제가 없는지 확인한다.
$ check_urdf test3dof.urdf
robot name is: test3dof
---------- Successfully Parsed XML ---------------
root Link: base has 1 child(ren)
    child(1):  base_link
        child(1):  link1
            child(1):  link2
                child(1):  link3
launch 파일 작성
$ cd ~/catkin_ws/src/test3dof_description/
$ mkdir launch
$ cd launch/
$ code test3dof.launch
완성된 test3dof.launch 파일
<launch>
  <arg name="model" default="$(find testbot_description)/urdf/test3dof.urdf" />
  <param name="robot_description" textfile="$(arg model)" />
  <node pkg="joint_state_publisher_gui" type="joint_state_publisher_gui" name="joint_state_publisher" />
  <node pkg="robot_state_publisher" type="robot_state_publisher" name="robot_state_publisher" />
</launch>roslaunch와 rviz를 각각 다른 터미널에서 실행한다.
[Terminal 1]
$ roslaunch test3dof_description test3dof.launch

[Terminal 2]
$ rviz
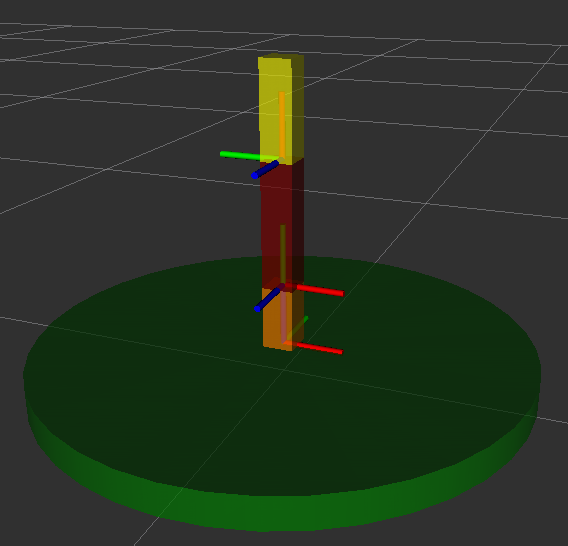
RobotModel을 추가하면 기본자세의 매니퓰레이터가 화면에 표시되고 TF를 추가하면 각 조인트의 축들이 색깔로 표시된다.
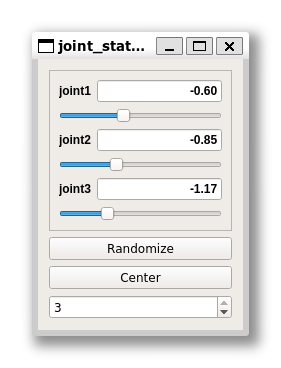
joint_state_publisher_gui 툴을 통해 조인트들을 조정할 수 있다. 이 툴에서 “Center” 버튼을 누르면 매니퓰레이터가 원래 위치로 돌아간다. 즉, 조인트 값들이 모두 0으로 조정된다.
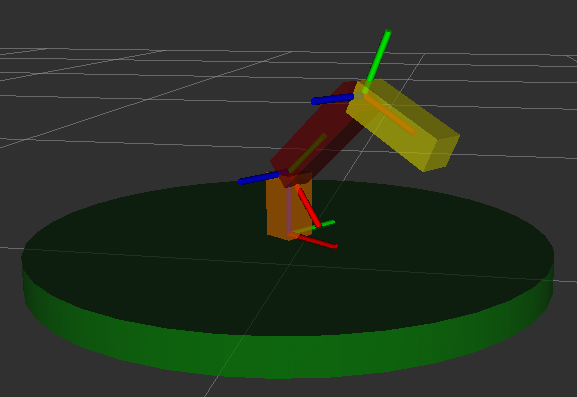
슬라이딩 바를 사용하여 각 조인트의 값을 조절하면 z 축(파란색)을 기준으로 조인트가 오른 법칙에 따라 회전하는 것을 확인할 수 있다.
rviz 파일 저장
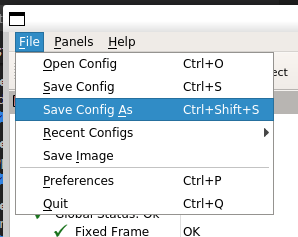
추가적으로 rviz 파일을 저장해보자. 현재 rviz에서 설정한 값들을 .rviz 파일에 저장해두면 나중에 동일한 설정값들을 그대로 재 사용할 수 있어 편리하다. 그리고 launch 파일에 rviz 노드를 추가하여 아규먼트에 저장한 rviz 파일을 지정하면 launch 만 실행해도 rviz가 이전에 저장한 설정값으로 실행된다.
rviz 파일을 저장하는 방법은 다음과 같다.
File > Save Config As > ~/catkin_ws/src/test3dof_description/rviz/에 test3dof.rviz로 저장
test3dof.launch 파일에 rviz 노드를 아래와 같이 추가한다.
<launch>
  <arg name="model" default="$(find test3dof_description)/urdf/test3dof.urdf" />
  <param name="robot_description" textfile="$(arg model)" />
  <node pkg="joint_state_publisher_gui" type="joint_state_publisher_gui" name="joint_state_publisher" />
  <node pkg="robot_state_publisher" type="robot_state_publisher" name="robot_state_publisher" />
  <node name="rviz" pkg="rviz" type="rviz" args="-d $(find test3dof_description)/rviz/test3dof.rviz"/>
</launch>
터미널 하나에서 아래 명령 실행하면 rviz가 실행되면서 RobotModel와 TF가 설정된 값으로 로드된다. 참고로 joint_state_publisher_gui를 통해 조정한 값들은 저장되지 않고 조인트들의 값은 모두 0으로 되어있다.
$ roslaunch test3dof_description test3dof.launch
'robotics > ROS' 카테고리의 다른 글
| URDF (0) | 2022.03.12 |
|---|---|
| WSL Ubuntu 18.04에 ROS Melodic 설치 (0) | 2022.03.08 |
| Raspberry Pi 4에 ROS 2 설치 (Install ROS 2 on Raspberry Pi 4) (0) | 2021.10.18 |
| ROS2 on the Windows10 with WSL2 (0) | 2021.01.19 |


댓글